The slight variation on this month's
Spice Trail Challenge from Vanesther at
Bangers & Mash is that rather than pick an individual spice to cook with, she has chosen a whole spicy cuisine, that of Mexico.
I am also trying to put a slight twist on this, in that the focus of my contribution is about making one of Mexico's ingredients, queso fresca. Not a spicy ingredient at all, but one that may be used to temper down chilli heat.
I have been dabbling rather unsuccessfully at making cheese for a year now, but fresh style cheeses are easier and quicker to play with, so this seemed a good opportunity to have another go. I now think my cheese should have been pressed for a short while to get to the more authentic texture but it did produce a well flavoured tub of cheese. The downside was that when baked it turned rather rubbery, so I cannot have produced the exact cheese I was looking for. If you have any thoughts on how to avoid cheese turning to 'rubber' when cooked please comment at the end! None the less I have some tasty soft cheese.
I was using a UK published book by Paul Peacock which may be out of print as the paperback no longer shows on Amazon. However, having looked on the internet there seems to be a very detailed and authentic american recipe for making Mexican queso fresco cheese here:
QuesoFresco. There is also an interesting link here for a
Mexican Cheese summary from web site
epicurious which is based on notes from Mexican cuisine expert Diane Kennedy.
So here is my Mexican Queso Fresco
This cheese needs a culture, either in the form of fresh buttermilk or a starter. I had some starter in my freezer so I used that. By good fortune the rather expensive chocolate melter I purchased a few years ago makes an excellent milk warmer for cheese making. The temperature ranges they both need are similar and both also require gentle heat and accurate temperature control. I can only get 2 litres of milk into this melter so a rather small volume of cheese follows. From 2 litres of milk I ended up with about 450g drained curd. Pressing would have reduced the weight further. I keep the whey and use it for bread or soups, or at worst my chickens have their mash made up with it.
The milk is slowly warmed to 34C before the rennet is added. It is then held at that temperature for an hour.
 |
| Some Useful Tools |
After an hour the curd is starting to set, you are looking for a 'clean break' ie the curd will hold together and leave a clear whey behind. A cloudy whey occurs when the curd has not set correctly and milk solids are breaking into small particles. I have tried to show how set the curd was, but my photos are not so clear. After the 60 minutes I decided to leave the curd for longer.
 |
| Cheese 1 hour after Rennet Added |
Testing again after 90 minutes;
 |
| Cleaner break after 90 minutes |
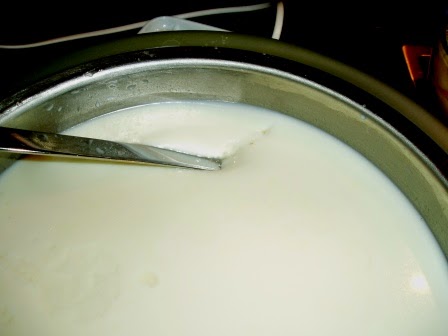
I still was not convinced it was ready so I left it for another 15 minutes;
 |
| Whey separating readily from the curd |
The curd is then cut into 2cm cubes and you see quite a separation of the whey as you do this.
 |
| Cutting the curd |
The temperature is increased to 40C for 15 minutes.
 |
| 'Cooked' curd |
Now to removing and draining the curds;
The curds are then hung up in a muslin cloth to drain;
Once the whey has stopped dripping you can untie and unwrap!
 |
| Curds after draining in muslin |
The curds are then salted and I put mine into a draining basket to allow a little more whey to drain off. At this point the cheese can be used.
So where better to look for a recipe using Mexican cheese than here:
I already had a blade of beef joint slow roasting in the oven flavoured heavily with hot smoked paprika and just needed something to serve with it. What I found was a swiss chard pasta dish and this worked really well even though I have never associated pasta with mexican food before.
So here we have Sopa de Macarron y Acelgas or Macaroni with Swiss Chard to accompany paprika roast blade of beef.
The pasta is cooked in water flavoured with mexican oregano (I knew I would need that herb sometime, takes it proudly from back of cupboard) scallion and salt. The pasta water is retained and added back later. After the pasta is cooked some garlic and finely chopped onions are softened in butter and then the chopped swiss chard is added and enough of the pasta water to keep everything moist. When the chard is cooked it is blended to a puree along with creme fraiche and extra pasta water to get a coating thickness to the sauce. The pasta is then stirred into the sauce, turned into a baking dish and put into a hot oven for about 10 minutes until bubbling, cheese sprinkled on top and then heated again to melt but not brown the cheese. This is where my cheese shrivelled up so it was scooped off (happy chickens) and we just added fresh cheese to the plated pasta.
The chard came from the garden and has survived the winter but now wants to run to seed so needs using up fast.
For the 'Mexican' Spice Trail round up pop over to
Vanester's blog early in May


What a great idea! I've never tried making my own cheese but I'm rather inspired now to have a go myself. Thanks so much for sharing in The Spice Trail challenge - Destination Mexico :)
ReplyDelete